Installing a crawl space dehumidifier takes about an afternoon: seal the space first (vapor barrier over dirt, vents closed), set the unit centrally on a raised, level base, run a ¾-inch drain line downhill to a drain or sump — or use a condensate pump where gravity won’t work — and plug into a grounded GFCI outlet. Set it to 55% RH and verify drainage.
What Should You Do Before Installing a Crawl Space Dehumidifier?
A dehumidifier dropped into an unsealed crawl space is a machine hired to dry out the earth itself. Prep work determines whether your unit cycles a few hours a day or runs flat-out forever, so handle these items first:
- Fix standing water. A dehumidifier removes vapor, not puddles. Grading problems, gutter discharge, and plumbing leaks need to be corrected before the unit goes in; if water pools after rain, a sump pump comes first.
- Lay a vapor barrier over exposed soil. Bare dirt floors release roughly 10 pints per day of ground moisture into the air — often more load than the house above contributes. Install 6-mil (or thicker, for encapsulation) polyethylene across the entire floor, overlap seams by at least 6 inches, tape them, and run the barrier 6–12 inches up the foundation walls.
- Close and seal the foundation vents. Open vents let humid outdoor air pour in all summer, replacing the air you just paid to dry. Sealed, conditioned crawl spaces are the configuration manufacturers design these units for; Aprilaire’s install manual, for example, treats “sealed” as the default crawl space condition.
- Treat existing mold and check the wood. Address visible growth and soft framing before sealing the space, so you are preserving clean wood rather than entombing a problem.
If you are still deciding whether your crawl space needs a dedicated unit at all, our crawl space dehumidifier guide covers the symptoms and the sizing logic in depth.
How Do You Install a Crawl Space Dehumidifier? (Step by Step)
The install itself is straightforward — placement, leveling, drainage, power, settings. Here is the full sequence.
Step 1: Size the unit for the space
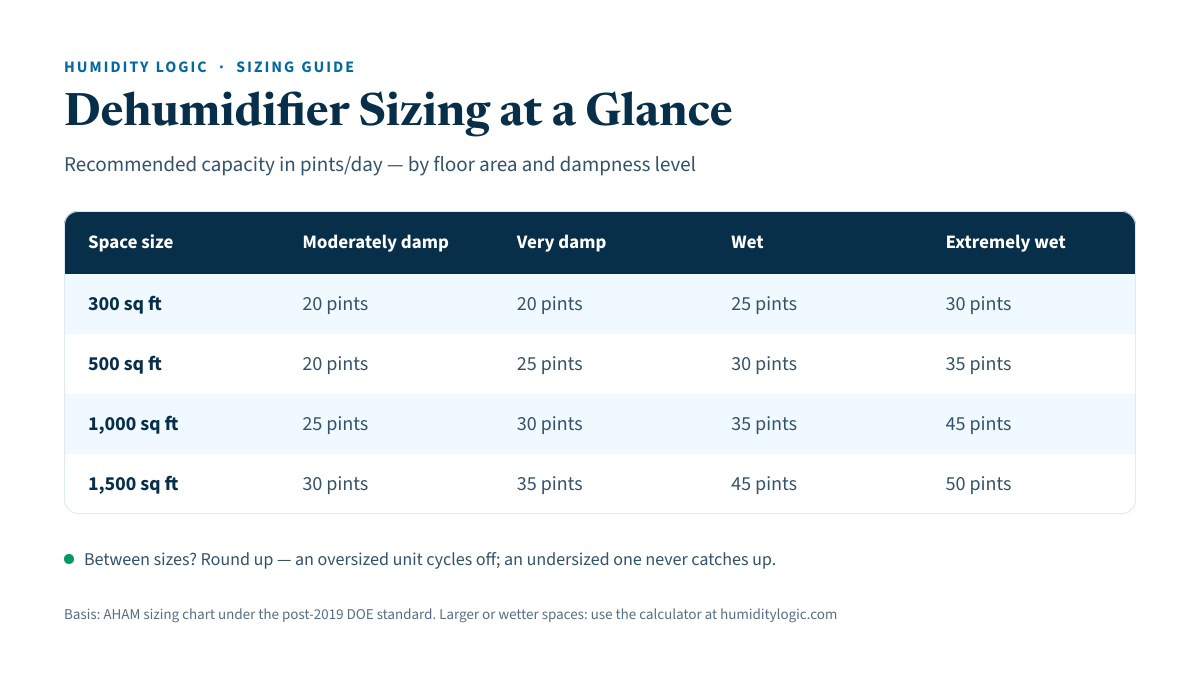
Measure the crawl space footprint and use our dehumidifier sizing calculator to get a pints-per-day target under the post-2019 AHAM test standard. Remember to bump capacity if any soil remains exposed, and note temperature: crawl spaces that sit below about 65°F need a low-temperature-capable unit with automatic defrost, because standard units ice up and lose most of their capacity in cool air.
Step 2: Unbox, inspect, and remove shipping brackets
Check the coil fins and cabinet for shipping damage. Several manufacturers (including Aprilaire) ship with a compressor bracket or strap that must be cut and removed before first run — skipping this causes vibration noise you will chase for weeks.
Step 3: Choose a central location with clearance
Place the unit near the center of the crawl space so dry air can circulate to every corner, and keep roughly 12–18 inches of open space at the air inlet and outlet. Avoid tight corners, ductwork dead zones, and spots against the foundation wall. Leave at least 6 inches of side clearance for filter removal — you will be changing that filter for years, so make it reachable from the access hatch side if possible.
Step 4: Elevate and level the unit
Set the dehumidifier on solid concrete blocks or riser pads so it sits at least 4–6 inches above the vapor barrier. Elevation protects the unit from any future water event and gives the drain fitting room to fall. Then level it: adjust the leveling feet until the built-in bubble level (or a torpedo level on the cabinet) reads true in both directions. An out-of-level unit drains poorly and can overflow its internal pan.
Step 5: Run the condensate drain
Thread a ¾-inch MNPT fitting into the drain outlet (PTFE tape on the threads) and run ¾-inch PVC pipe or reinforced tubing to your termination point. Two rules govern every gravity drain:
- Maintain a continuous downward slope from the unit to the drain — no bellies, no uphill sections, and no soft tubing curled on the floor, which airlocks the line.
- Terminate at a legal location: a sump basin, floor drain, or a sealed exterior penetration that discharges away from the foundation.
Some models (Santa Fe’s ducted units among them) require a p-trap with a vent after the trap in the drain line; check your manual, because an untrapped drain on those units pulls air backward through the line and stops condensate flow.
Step 6: Add a condensate pump if gravity won’t cooperate
If the nearest drain sits higher than the unit or across the crawl space, install a condensate pump — either the built-in pump on pump-equipped models or a manufacturer’s add-on kit. Typical pumps lift about 15 feet vertically, which comfortably clears a rim joist for exterior discharge. Route the discharge line so water cannot flow back into the pump reservoir, and connect the pump’s safety float switch per the manual so the dehumidifier shuts off if the pump ever fails. Our dehumidifier with pump guide compares built-in versus external pump setups.
Step 7: Connect power — GFCI required
Plug the dehumidifier (and pump, if used) directly into a grounded, GFCI-protected outlet. The National Electrical Code requires GFCI protection for receptacles in crawl spaces at or below grade, and manufacturers like Santa Fe additionally call for a dedicated circuit. Never use an extension cord or plug adapter. If there is no outlet within reach of the factory cord — or no crawl space outlet at all — installing one is a job for a licensed electrician, not a DIY task. New circuits, junction boxes, and hardwiring all fall under permit-and-electrician territory.
Step 8: Set 55% RH and verify operation
Power the unit on and set the humidistat to about 55% relative humidity — the sweet spot that stops mold and wood rot without over-drying framing lumber. Let it run, then confirm three things: the outlet is blowing warm, dry air; water is moving through the drain line to its termination; and the unit cycles off once it reaches setpoint. Check the drain again after the first week, since early debris is the most common cause of clogs.
Gravity Drain or Condensate Pump: Which Should You Use?
Gravity is free, silent, and never burns out — use it whenever the site allows. The pump earns its keep only when the drain point is higher than the unit.
| Factor | Gravity drain | Condensate pump |
|---|---|---|
| Requirement | Continuous downhill slope to drain | Outlet for pump power (GFCI) |
| Vertical lift | None — downhill only | About 15 ft |
| Failure modes | Clogs, line sags/airlocks | Clogs, pump or float failure |
| Maintenance | Flush line yearly | Clean reservoir, test float switch |
| Best for | Sump or floor drain below unit level | Discharge up and out through rim joist |
Should You Hang the Unit or Set It on the Floor?
Floor mounting on blocks is the default for crawl spaces; hanging is the fix for flood-prone or ultra-tight ones. Manufacturers sell hang kits that suspend the unit from structural framing members — never from the cabinet itself, and never by its sides or ends. Keep the leveling feet installed even when hanging, keep the unit level, and add a secondary drain pan beneath any unit suspended over finished space. Hanging costs a little headroom and makes filter changes more awkward, so choose it only when the floor is genuinely at risk of water.
What Maintenance Does the Installation Need Afterward?
A well-installed unit asks for minutes per year, not hours. Wash or replace the filter every 6–12 months (dirty filters are the top cause of capacity loss), flush the drain line each spring, test the condensate pump’s float switch if you have one, and glance at a hygrometer periodically to confirm the space is holding near 55% RH. If readings drift upward with no equipment fault, look for a breached vapor barrier or an unsealed vent — the same physics that governs basement humidity problems applies one level down.
Frequently asked questions
Can I plug a crawl space dehumidifier into an extension cord?
No. Every major manufacturer prohibits extension cords because they can overheat and drop voltage under the compressor load. Plug the unit directly into a grounded, GFCI-protected outlet, and hire a licensed electrician if no outlet is within reach of the cord.
Do I need a vapor barrier before installing a crawl space dehumidifier?
Yes, if you have any exposed soil. A bare dirt floor adds roughly 10 pints per day of ground moisture, so the dehumidifier fights a losing battle without a barrier. Lay 6-mil or thicker poly with overlapped, taped seams first.
What humidity level should I set a crawl space dehumidifier to?
Set it to about 55% relative humidity. That is dry enough to stop mold growth and wood rot but avoids over-drying, which wastes electricity and can shrink framing lumber. Most units cycle on and off automatically to hold the setpoint.
How far can a condensate pump push water out of a crawl space?
Built-in and add-on condensate pumps typically lift water about 15 feet vertically, with longer horizontal runs possible after the lift. That is enough to reach a rim-joist penetration or utility sink in almost any US crawl space.
Will a dehumidifier work in a cold crawl space?
Standard units lose capacity and can ice their coils below about 65°F. If your crawl space runs cooler than that for much of the year, choose a low-temperature-capable crawl space unit with hot-gas or automatic defrost rated to operate near 40°F.
Sources & references
Every figure on this page is checked against these published sources. Last reviewed July 21, 2026.