To lower humidity in your house, start with the three moves that cost the least: run exhaust fans during and for 20 minutes after showers and cooking, vent your clothes dryer outdoors, and fix the drainage around your foundation. If the air still feels damp, add a right-sized dehumidifier set to 45–50%. Your target is 30–50% RH, and never above 60%.
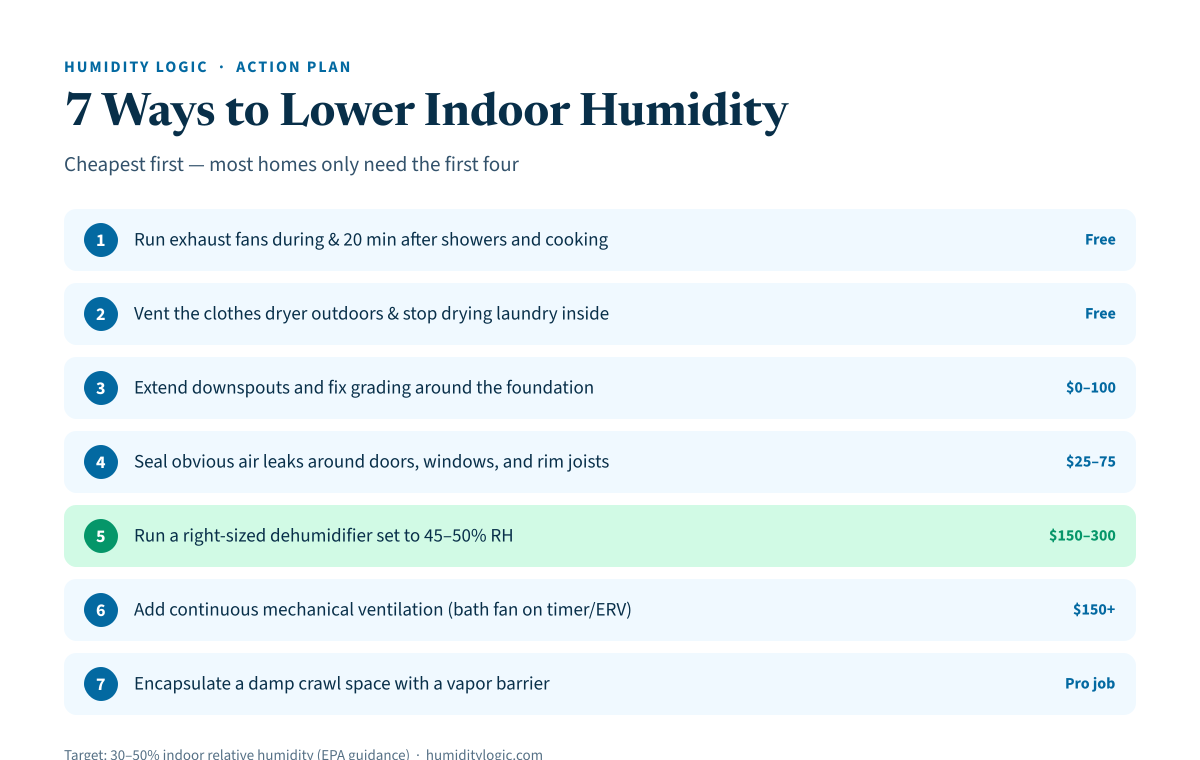
The order below matters. A family of four adds gallons of water vapor to the air every day through cooking, showering, laundry, and simply breathing. If you buy a dehumidifier before shutting off those sources, you pay every month to remove moisture you could have kept out for free. This plan runs cheapest-first, so each step only has to handle the moisture the previous steps didn’t eliminate. If you’re still diagnosing where the moisture comes from, our guide to why your house is so humid walks through the usual suspects.
1. Are You Running Exhaust Fans During — and After — Showers and Cooking?
The cheapest dehumidifier in your house is already installed in your bathroom ceiling. A single hot shower releases a surprising amount of water into the air, and that moisture doesn’t leave on its own — it migrates into towels, drywall, and the hallway.
Run the bathroom exhaust fan for the entire shower, then leave it on for 20 minutes afterward. The same rule applies in the kitchen: run the range hood whenever you boil, simmer, or fry, and keep lids on pots. The Department of Energy recommends bathroom fans rated at least 50 CFM and kitchen range hoods at least 100 CFM, and — critically — both must vent to the outdoors. A fan that dumps into the attic or a recirculating range hood just relocates the moisture.
Two quick checks: hold a square of toilet paper against the running bathroom fan grille (it should stick firmly), and confirm the duct actually exits through the roof or wall. If your bathroom has no fan at all, a bathroom dehumidifier is the workaround until you can install one.
Cost: $0 if fans exist. Impact: high in bathrooms and kitchen, moderate house-wide.
2. Is Your Dryer Vented Outdoors — and Are You Line-Drying Inside?
Every load of laundry holds several pints of water, and all of it ends up somewhere. The EPA is blunt about this: clothes dryers should be vented to the outside, never into a garage, crawl space, or attic. A disconnected or crushed dryer duct is one of the most common hidden moisture sources in US homes — pull the dryer out and check that the duct is intact, connected, and terminates outdoors with a working flap.
Indoor line-drying is the same problem without the duct. Drying a load on an indoor rack releases those pints directly into your living space. If you line-dry to save energy, do it outdoors or in a room with an exhaust fan running — otherwise you’re trading a few cents of electricity for a humidity problem.
Cost: $0–$25 for duct repairs. Impact: high in laundry areas and small homes.
3. Where Does Your Roof Water Go? Extend Downspouts and Fix Grading
Persistent whole-house humidity often starts outside. When downspouts dump roof water next to the foundation, or the soil slopes toward the house, that water soaks the ground around your basement or crawl space and migrates inward through concrete and soil as vapor. The EPA lists poor drainage around the foundation among the primary moisture sources that drive indoor mold.
The fixes are a weekend job: extend every downspout at least 4–6 feet from the foundation ($10–$20 per extension), clean the gutters so they don’t overflow, and regrade any soil that slopes toward the house so it falls away instead — aim for roughly 6 inches of drop over the first 10 feet. If your basement humidity spikes after every rain, this step is almost certainly your problem.
Cost: $50–$200 DIY. Impact: high for basements and crawl spaces.
4. Where Is Humid Air Leaking In? Seal the Gaps
In summer, every gap in your home’s envelope is a one-way street for muggy outdoor air. Rim joists, attic hatches, plumbing and wiring penetrations, and worn door weatherstripping let humid air infiltrate continuously, forcing your AC and dehumidifier to process moisture that never needed to enter.
Work through the usual leak points with caulk, spray foam, and weatherstripping: the sill plate and rim joist in the basement, gaps around pipes under sinks, the attic hatch, and exterior door sweeps. Air sealing is one of the rare upgrades that lowers both your humidity and your energy bill, because your cooling system stops fighting a constant stream of outdoor moisture.
Cost: $50–$150 in materials. Impact: moderate, but it multiplies the effect of every step after it.
5. Still Above 50%? Add a Right-Sized Dehumidifier
Once the free fixes are done, a dehumidifier handles the moisture that remains — and sizing is the decision that makes or breaks it. An undersized unit runs nonstop and never reaches setpoint; a wildly oversized one costs more upfront than needed. Use our dehumidifier size calculator to match pint capacity to your square footage and dampness level.
Set it to 45–50%. That keeps you inside the EPA’s ideal 30–50% RH band without making the unit chase an unnecessarily low target, which wastes electricity. Place it where the moisture is — usually the basement — with airflow unobstructed, and empty the tank or, better, run a drain hose so it never shuts off full. Check progress with a $10 hygrometer rather than guessing; our guide to ideal indoor humidity levels covers what the readings should look like season by season.
One AC note belongs here: if your house is cold but clammy, your air conditioner may be oversized. An oversized AC short-cycles — it satisfies the thermostat in a few minutes and shuts off before its coil runs long enough to condense meaningful moisture. Longer runtimes at lower capacity dehumidify far better than short blasts. A dehumidifier compensates; at replacement time, insist on a Manual J load calculation so the new system is sized to run steadily.
Cost: $150–$300 for a quality portable unit. Impact: the single biggest controllable lever — this is the step that reliably moves the number.
6. Does Your Home Need Continuous Mechanical Ventilation?
Tightly built or recently air-sealed homes can trap moisture generated indoors. The DOE’s answer is whole-house mechanical ventilation: a quiet, continuously running system that exhausts stale, moist air and brings in fresh air at a controlled rate, rather than relying on random leaks.
The options, roughly in order of cost: a continuous-duty exhaust fan (often an upgraded bath fan running at low speed), a supply or balanced system, or an energy recovery ventilator (ERV). An ERV transfers heat and moisture between the outgoing and incoming airstreams, which the DOE notes makes it suitable for humid climates — in summer it strips part of the moisture from incoming air before that air enters your living space. This step is for homes that stay stuffy and damp even after steps 1–5, and for anyone who has recently tightened their envelope.
Cost: $150 for a continuous bath fan to $2,000+ installed for an ERV. Impact: moderate to high in tight homes.
7. Is Your Crawl Space the Source? Encapsulation Is the Pro Fix
If you have a vented dirt-floor crawl space, the ground under your house releases water vapor upward around the clock, and stack effect pulls that air into your living space. No upstairs dehumidifier can win against an open earth floor.
Encapsulation closes the loop: a heavy vapor barrier sealed across the floor and up the walls, foundation vents sealed, and the space dried with a dedicated unit — see our crawl space dehumidifier guide for sizing. This is a professional job in most homes ($3,000–$8,000 typical, more with drainage work), which is why it’s last on the list. But for homes over chronically damp crawl spaces, it’s the fix that finally makes every other step hold.
Cost: $3,000–$8,000 professional. Impact: transformative for the homes that need it.
What Barely Works: Rice, Charcoal, and Other Humidity Myths
Passive moisture absorbers are the most persistent myth in this category. Bowls of rice, charcoal briquettes, rock salt, baking soda, and hanging desiccant bags all absorb some water — a few ounces before they saturate. Meanwhile your household is adding gallons of vapor per day. The math doesn’t close: a desiccant can protect a camera case or a closet shelf, but it cannot measurably lower the humidity of a room, let alone a house.
Two other habits get oversold. Houseplants do release water vapor, but a few plants are a rounding error next to showers and cooking — rehoming them won’t rescue a damp house. And opening windows only helps when outdoor air is drier than indoor air; on a muggy July afternoon it does the opposite.
Which Step Should You Do First?
| Step | Typical cost | Best for |
|---|---|---|
| 1. Exhaust fans, during + 20 min after | $0 | Every home |
| 2. Vent dryer out, stop indoor line-drying | $0–$25 | Laundry-area dampness |
| 3. Extend downspouts, fix grading | $50–$200 | Damp basements after rain |
| 4. Seal air leaks | $50–$150 | Muggy summers, high bills |
| 5. Right-sized dehumidifier at 45–50% | $150–$300 | RH still above 50% |
| 6. Continuous mechanical ventilation | $150–$2,000+ | Tight, stuffy homes |
| 7. Crawl space encapsulation | $3,000–$8,000 | Vented dirt crawl spaces |
Do steps 1–4 this weekend — they’re nearly free and they shrink the job. Then measure. If a hygrometer still reads above 50% after a few dry days, size a dehumidifier for the remaining load and let it hold the line at 45–50%. That sequence gets almost every house into the 30–50% RH range for the least money — and keeps it there.
Frequently asked questions
What is the fastest way to lower humidity in a house?
Run a dehumidifier sized for the space with the setpoint at 45–50% and close windows and doors while it works. A correctly sized unit can pull a damp room down 10–15 percentage points within a day. Exhaust fans and AC help, but a dehumidifier removes moisture directly and shows results fastest.
What humidity level should my house be?
The EPA recommends keeping indoor relative humidity below 60% at all times, and ideally between 30% and 50%. Above 60%, mold, dust mites, and musty odors become likely. Most people find 40–50% comfortable in summer without over-drying the air.
Do bowls of rice or charcoal actually reduce humidity?
Barely. Passive desiccants like rice, charcoal, rock salt, or silica pouches absorb a few ounces of water at most, while everyday cooking, showering, and breathing in a family home release gallons of water vapor per day. They can protect a closed drawer or safe, but they cannot move whole-room humidity in any measurable way.
Why is my house humid even with the AC running?
An oversized air conditioner cools the air so quickly that it short-cycles — it shuts off before running long enough to condense much moisture out of the air. You end up with a cold, clammy house. Longer, slower cooling cycles, a lower fan speed, or a supplemental dehumidifier fix the problem.
Will opening windows lower indoor humidity?
Only when the outdoor air is drier than the indoor air, which is common in fall and winter but rare on muggy summer days. On a humid day, opening windows raises indoor humidity. Check the outdoor dew point first: if it is above roughly 60°F, keep the windows closed and dehumidify instead.
Sources & references
Every figure on this page is checked against these published sources. Last reviewed July 21, 2026.