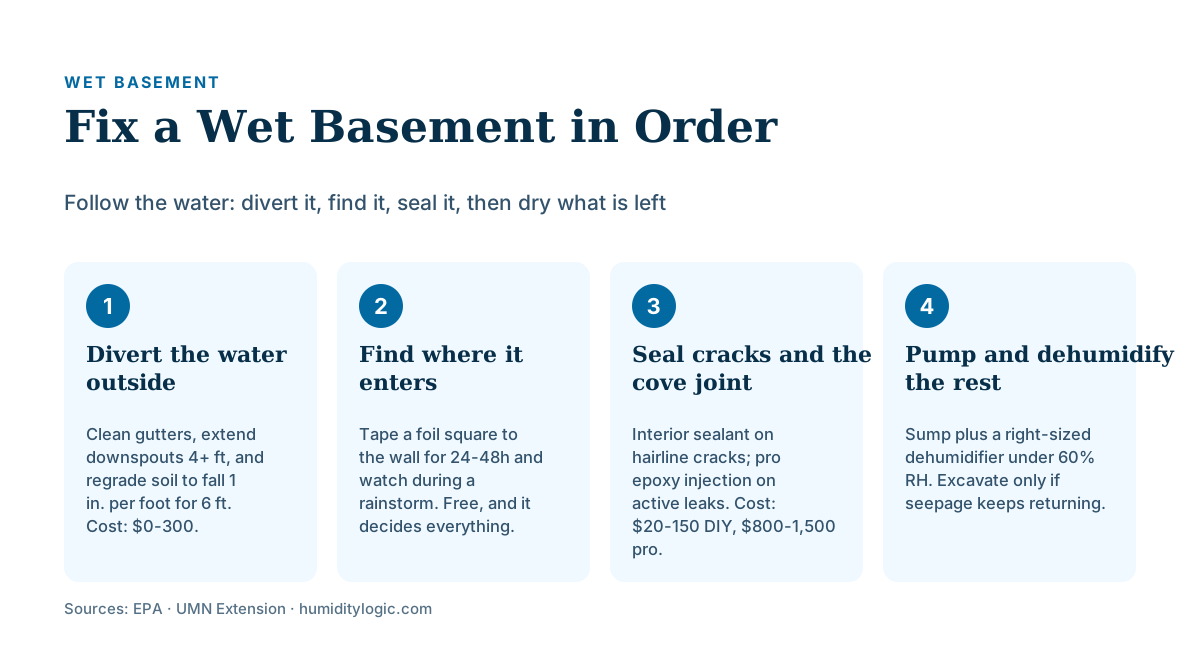
A wet basement almost always means liquid water is getting in from outside, not just humid air. The fix follows the water: divert roof and surface runoff first with gutters and grading, seal the cracks and cove joint it enters through, then pump and dehumidify what is left. Keep indoor humidity under 60%, and dry any flooded materials within 24-48 hours to stop mold.
What causes a wet basement?
A wet basement is liquid water finding a way in, and the University of Minnesota Extension narrows the source to three things: rain and groundwater, interior moisture like unvented dryers and bathing, and humid outdoor air condensing on cool surfaces. For actual wetness — puddles, damp streaks, water after a storm — the first source dominates.
The reason is simple geometry. A single inch of rain drops more than 1,200 gallons on a 2,000-square-foot roof, and every gutter and downspout exists to move that water away from the wall. When gutters clog or a downspout empties at the foundation, that water soaks the soil right against the basement and builds pressure. Grading makes it worse or better: if the ground is level or slopes toward the house, UMN notes, water is steered straight into the basement.
Once the soil is saturated, water enters under hydrostatic pressure through the weakest openings:
- The cove joint. Poured foundations are built in two pours — walls first, then the floor slab — so the seam where they meet is never watertight. It is the single most common entry point, and water often appears there first as a wet line along the floor.
- Cracks in the wall or slab. Shrinkage and settlement cracks widen over time and channel water inward during heavy rain.
- Window wells and porous block. Wells with clogged drains fill and spill over the sill, and concrete block can wick water through its cores.
Interior sources and condensation still matter, but they cause a damp basement, not a wet one. If you are chasing a musty smell and a high hygrometer reading rather than visible water, that is the humidity-level problem covered in our basement humidity guide — a different fix from stopping a leak.
How do I find where the water is getting in?
Watch the basement during an actual rainstorm and mark every spot where water appears. That single observation tells you whether you are fighting surface runoff, hydrostatic seepage, or condensation — and each has a different fix.
If water shows up along the floor-wall seam or trickles from a specific crack during rain, you have liquid water entering under pressure. If it only appears in humid weather with no rain, as a general dampness or beads on cold pipes and walls, you are likely dealing with condensation instead.
For the ambiguous cases, the foil test settles it for free. Tape a 12-inch square of aluminum foil tightly to the wall, sealing all four edges, and leave it 24 to 48 hours:
- Moisture on the room-facing side means humid indoor air is condensing on the cool wall — a ventilation and dehumidification problem.
- Moisture trapped behind the foil means water is pushing through the wall from the soil — that points to exterior water management and sealing, not just a dehumidifier.
If you can see water running in or pooling after rain, skip the test: you already have a bulk-water problem, and no dehumidifier will keep up until the water is diverted. The same logic applies next door in a crawl space, where a ground vapor barrier does the heavy lifting.
How do I fix a wet basement, cheapest first?
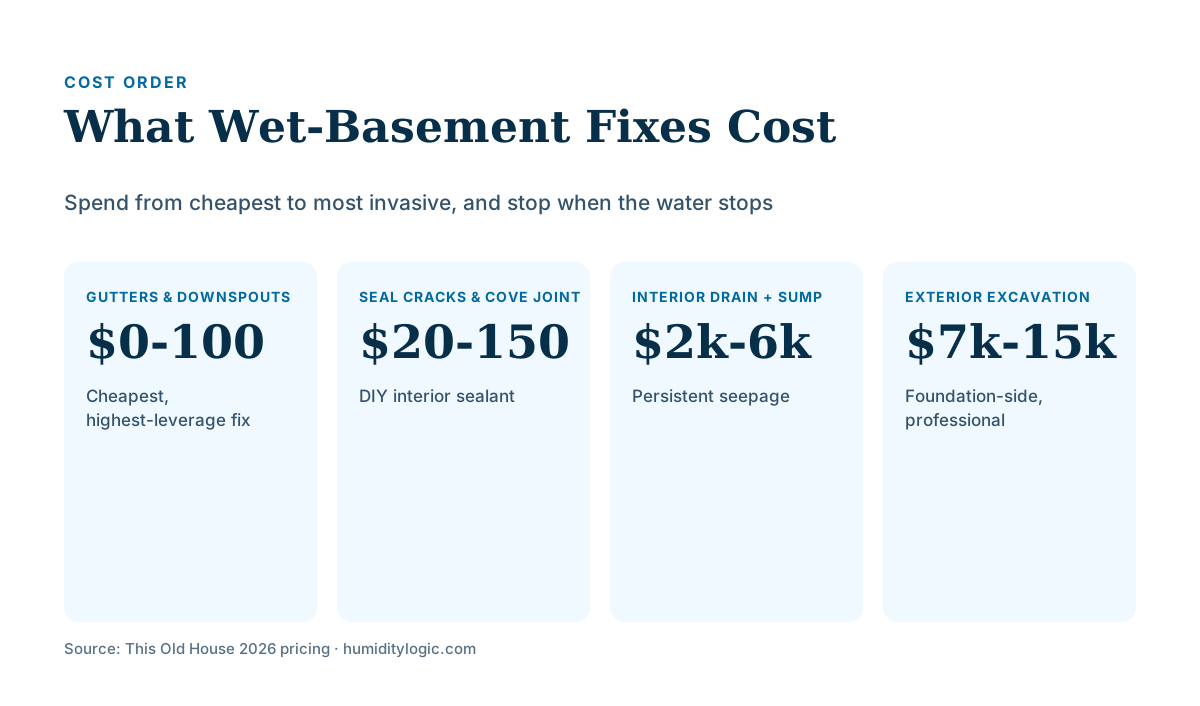
Spend money in the order water actually reaches the basement: divert it outside first, seal what still gets through second, and only bring in pumps, drains, or excavation when the cheaper fixes fall short. The EPA is blunt that fixing the water source has to come before cleanup, or the problem returns.
| Fix | Typical cost | What it addresses |
|---|---|---|
| Clean gutters, extend downspouts 4+ ft from the wall | $0-100 | Roof runoff at the foundation |
| Regrade soil to slope away 1 in. per foot for 6 ft | $0-300 DIY | Surface water pooling |
| Seal cove joint and visible cracks (masonry sealant) | $20-150 | Minor seepage |
| Professional crack injection (epoxy/polyurethane) | $800-1,500/crack | Active, recurring leaks |
| Interior drain tile plus sump pump | $2,000-6,000 | Persistent hydrostatic seepage |
| Exterior excavation and waterproofing | $7,000-15,000 | Foundation-side failure |
Work down the list and stop when the basement stays dry through a storm. Most homes never reach the bottom two rows.
Start outside — it is the highest-leverage fix there is. UMN’s guidance is to correct grading, gutters, and downspouts before installing any drainage system. Extend every downspout to discharge at least 4 feet beyond the wall (farther is better), and build the soil up so it falls away from the foundation at 1 inch per foot for the first 6 feet. A sump pump cannot out-run a downspout emptying at the wall.
Then seal the entry points. With the outside water managed, patch the cove joint and any hairline cracks with hydraulic cement or a masonry sealant. Cracks that keep leaking under pressure need professional polyurethane or epoxy injection rather than a surface patch.
Only then condition and pump. Once bulk water is diverted and sealed, a right-sized dehumidifier handles the residual dampness — use the dehumidifier sizing calculator and add about 5 pints per day because the space is below grade. Run it to a floor drain or sump so you never empty a bucket, and keep the room under 60% relative humidity. Our basement dehumidifier buying guide covers pint sizing, placement, and drainage in detail.
What do I do about a flooded basement right now?
Get the water out and the space dry within 24 to 48 hours, because the EPA warns that materials left wet past that window will usually grow mold. But safety comes first: do not enter standing water near live electrical circuits, and shut off power to the basement before you begin.
Once it is safe, the EPA’s flood-cleanup sequence is to pump or vacuum out the water, remove mud and anything porous that cannot be cleaned and dried, clean every wet surface, and then dry the space completely with open windows and dehumidifiers. Carpet, drywall, and insulation that stayed soaked usually have to go — a dehumidifier sized for mold prevention helps only after the wet materials are removed. Treat any flood involving sewage or river water as a professional job, not DIY.
When is a wet basement a professional waterproofing job?
Call a professional when water keeps returning after you have corrected the gutters, grading, and sealing — that pattern means hydrostatic pressure the surface fixes cannot beat. Standing water that reappears every storm, and mold covering more than about 10 square feet, are the two clearest thresholds for bringing in help.
Persistent seepage is a foundation-drainage problem, and the engineered solutions live at the bottom of the cost list: interior drain tile piped to a sump pit, or full exterior excavation and waterproofing. This Old House puts an interior drain-and-sump system in the $2,000-6,000 range and exterior excavation at roughly $7,000-15,000 for a typical basement — real money, but the alternative is a basement you can never finish or trust.
For everything short of that — a damp corner, a musty smell, a hygrometer stuck in the high 50s — the path is the same three steps in order. Divert the outside water, seal the entry points, and let a correctly sized dehumidifier hold the humidity down. If your problem is dampness rather than visible water, start with the basement humidity guide instead; it tackles the same space from the humidity-level angle.
Frequently asked questions
What causes a wet basement?
A wet basement is almost always liquid water entering from outside, not just humid air. The University of Minnesota Extension traces it to three sources: rain and groundwater forced in through cracks and joints, interior moisture from appliances and bathing, and humid outdoor air condensing on cool walls. Poor grading, clogged gutters, and downspouts that dump at the foundation are the most common triggers.
How do I stop water from coming into my basement after heavy rain?
Start outside, because rain water reaches the wall before it reaches the crack. Clean the gutters, extend downspouts at least 4 feet from the house, and regrade the soil so it slopes away 1 inch per foot for the first 6 feet. Those steps solve most rain-driven leaks for under $300 before any sealing or waterproofing is needed.
Is a wet basement an emergency?
Standing water is time-sensitive rather than an emergency in most cases. The EPA warns that materials wet for more than 24 to 48 hours will usually grow mold, so pump out the water and dry the space fast. Turn off power to any flooded circuits first, and treat water from sewage backups or river flooding as a professional cleanup.
Can I fix a wet basement myself?
Diagnosis and the cheapest fixes are DIY: clearing gutters, regrading, and sealing small cracks with masonry sealant. Recurring seepage under hydrostatic pressure, interior drain tile, sump systems, and exterior excavation are professional work. The EPA also says mold covering more than about 10 square feet should be handled by a professional.
How much does it cost to fix a wet basement?
It depends entirely on how far down the list you go. Gutter and grading corrections run $0 to $300, DIY crack sealing $20 to $150, and a professional interior drain-tile and sump system roughly $2,000 to $6,000. Full exterior excavation waterproofing is the most expensive route at about $7,000 to $15,000.
Sources & references
Every figure on this page is checked against these published sources. Last reviewed July 21, 2026.